Getting Your Goggles Ready
Calibrate
Please calibrate your goggles before use. The electronic compass in your goggles was factory calibrated in Atlanta Georgia before the goggles were shipped to you. The strength and distortion of the magnetic field in your geographic region will probably be different however. It is important that the compass is calibrated before using the goggles for the first time and anytime that you change your geographic region.
Make sure that the goggles are properly supported on something round and cylindrical, such as your swim buoy, a rolled up beach towel, a roll of paper towels etc. Make absolutely certain that you are not near sources of electrical or magnetic interference, such as steel, iron, power lines or magnets. The compass should be calibrated at the temperature of your environment, never after retrieving from a hot car.
Press and hold the button on the goggles for 5 seconds, or until the LEDs start to flash yellow. Then rotate the goggles in smooth and methodical figure 8 motions. Try your best to rotate the goggles on as many axes as possible. Visualize a sphere. The compass will calibrate faster if you rotate the goggles into new and unique positions around the surface of the virtual sphere. Continue to rotate the goggles until the LEDs change from flashing yellow to green. Flashing green indicates that your compass is calibrated and your goggles are ready for use.
Verify
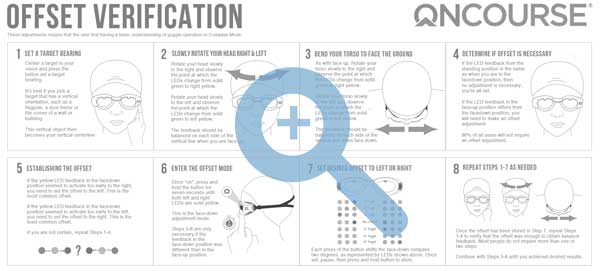
Your goggles were configured at the factory to work on 90% or more of all users. Some users will have to offset the goggle settings to accommodate for their facial geometry. Please follow the steps below to determine if your goggles require adjustments.
With the goggles on and the LEDs blinking simultaneous green, face a target and press the button to store the target. It’s best if you pick a target that has a vertical orientation, such as a door frame, a flagpole or the corner of a wall or building
Rotate your head slowly to the right and observe the point at which the LEDs change from solid green to right yellow. Rotate your head slowly to the left and observe the point at which the LEDs change from solid green to left yellow. The feedback should be balanced.
Center the target again in your vision, then slowly bend your torso down at the waist to face the ground. Be sure to follow the vertical line.
Rotate your torso at the waist slowly to the right and observe the point at which the LEDs change from solid green to right yellow. Rotate your torso slowly to the left and observe the point at which the LEDs change from solid green to left yellow. The feedback should be balanced on each side of the vertical line.
If the LED feedback from the standing position is the same as when you are in the facedown position, then no adjustment is necessary; you’re all set.
If the LED feedback in the face-up position differs from the face-down position, you will need to make an offset adjustment…
Customize if Needed
We are using an example where the goggles show yellow LED feedback on the right side, when you are in the face-down position. Press and hold the button until the LEDs are both solid yellow, then release the button. If the yellow LED feedback in the face-down position seemed to activate too early to the right, you need to set the offset to the left.
Press and release the button once until you see one green LED on the left only and pause. This one step to the left. Then, press and hold the button for 1 second to store the setting. The LEDs will change back to flashing green. Run the face-up, face-down test again.
If the yellow LED feedback in the face-down position still seems to activate too early to the right, you need to set the offset more to the left. Press and hold the button until the LEDs are again both solid yellow and release the button.
Press and release the button two times, until you see one yellow LED on the left and pause. This two steps to the left. Then, press and hold the button for 1 second to store the setting. The LEDs will change back to flashing green. Run the face-up, face-down test again.
If the yellow LED feedback in the face-down position still seems to activate too early to the right after two steps to the left, you need to set the offset one more final step to the left.
Press and hold the button until the LEDs are both solid yellow and then release. Press and release the button three times, until you see one red LED on the left only and pause. This three steps to the left. Then, press and hold the button for 1 second to store the setting. The LEDs will change back to flashing green. Run the face-up, face-down test one final time.
If you find, in the very rare instance, that your face-down feedback is incorrect to the left (yellow LED on the left when face down), you should follow the steps above, but make your offset adjustment in steps to the right, instead of to the the left as described above. A green LED in the right lens is one step, yellow LED is two steps, and red LED is three steps. Most people will NOT have undesired yellow feedback on the left when in the face-down position and therefore would not need to make offset adjustments to the right, but this option is provided anyway.
Swim
Once your goggles have been calibrated at your geographic location and you have verified the face-up, face-down deviations, you are ready to swim. User’s must adhere to safety guidelines and remain aware of their surroundings at all times.
Face the target and center in your vision and press the button to store your target. The goggles’ green LEDs will change from blinking green to solid, indicating a target bearing has been entered and stored. Begin to swim.
The goal is to remain oriented so that both LEDs remain green. If you should veer of course to the left a small amount, both green LEDs will extinguish and the yellow LED in the left eyepiece will illuminate to notify you that must correct your swim in order to get back On Course. If you deviate even further to the left, the yellow LED will extinguish and the red LED will illuminate notifying you that major correction is necessary to the right in order to get back On Course. You should slowly turn your head to navigate back on course. If you move you head or torso, your body will follow. In this example, the red LED will change to yellow, then finally two green LEDs when your heading has been reestablished. The goggles will provide similar feedback if you deviates to the right; first a yellow LED, then a red LED if too far off course. In most cases, you only needs to make minor corrections and move your head slightly; the body will follow the head to get you back on course.
The LEDs should remain accurate and stable as you turn your head to breathe. If you see a lot of feedback where the LEDs change frequently to yellow and then back to green, it is advised that you use this feedback to help you improve your body position and stability while you swim.
Once the first destination is reached, the swimmer will establish a new heading by repeating the steps listed above.
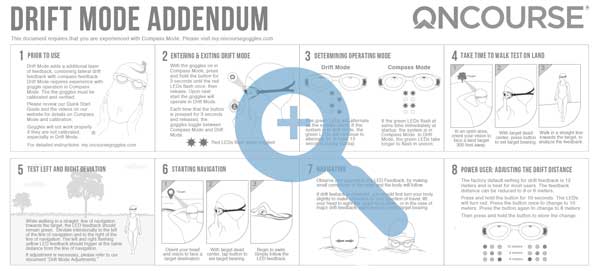
The steps above describe using the goggles in Compass Mode, which will provide the longest battery life and is easy to setup and use. The goggles can also be set to Drift Mode which uses a variety of other sensors to determine if high currents of water or wind have pushed you off course laterally. Drift Mode requires more detailed configuration and results in substantially shorter battery life. We encourage users to become familiar with Compass Mode before advancing to Drift Mode.
What is Compass Mode?
In Compass Mode, OnCourse Goggles rely exclusively on an electronic compass to determine the orientation of the swimmer’s head prior to starting a swim as well as during the swim. There are a variety of other sensors that are inactive in Compass Mode but can be used if the Goggles are operated in Drift Mode. Compass Mode provides the longest battery life (up to 24 hours of use) and is best for most users until they become familiar with their goggles and the feedback system. Compass Mode does not require the level of user adjustments and complicated verification of compass accuracy that is required with Drift Mode.
Compass Mode provides only one form of navigation feedback. After storing a target bearing, If the user moves their head or torso to the left or the right of the stored target bearing the LEDs will change from solid green, to yellow or red in the left or right eyepiece depending upon the direction of the angular deviation. The goal is to keep the LEDs green at all times.
The sensors in the goggles anticipate motions associated with normal movement of the user, so that the LEDs are stabilized when the user turns their head to breathe. The feedback of the goggles is also used as a training aid to encourage the swimmer to maintain proper head and torso position while swimming and breathing.
Changing Modes
Every time that the user presses and holds the button on the goggles for three seconds, the red LEDs will flash indicating that the button should be released. The goggles toggle between Compass Mode and Drift Mode each time this process is repeated. Example: From Compass Mode, press and hold the button for three seconds until the red LEDs flash and then release the button. The next time that you turn on the goggles, Drift Mode will be active, Repeat the process to return to Compass Mode.
What is Drift Mode?
In Drift Mode, OnCourse Goggles first leverage the electronic compass used in Compass Mode to determine the orientation of the swimmer’s head prior to starting a swim and then during the swim. The system compares the compass heading to the stored target bearing to provide feedback to the user. In Drift Mode, storing the target bearing also establishes a trajectory or line of navigation from the start point. Once this line of navigation has been established a variety of other sensors including a GNSS (GPS + GLONASS) module are then activated and this GNSS (GPS) data is combined with compass and accelerometer data to determine if the swimmer has drifted laterally due to currents of water or wind. These combined methods provide varied feedback to the swimmer for angular and lateral deviation using GNSS (GPS + GLONASS) positioning data. In Drift Mode, the forward compass heading, back bearing from start point and distance from the line of navigation are monitored for deviation. OnCourse Goggles can also be operated using the compass only, when in Compass Mode.
Drift Mode is customizable and requires a higher level of understanding, calibration and testing prior to use, which is specific to the user. Battery life is reduced to 2.25 hours when Drift Mode is used. In addition, in Drift Mode, the googles need to be adjusted to the facial geometry of the user. For these reasons and since compass accuracy is critical for proper operation in Drift Mode, a method exists in the software for the swimmer to test and adjust the goggle fit for the greatest compass accuracy.
Drift mode provides two forms of feedback to the user; solid yellow or red LEDs if the head or torso angle (the user’s heading) deviates from the stored compass bearing and flashing yellow or red LEDs if the user is pushed sideways due to high currents of water or wind, even though the compass heading has not changed.
Changing Modes
Every time that the user presses and holds the button on the goggles for three seconds, the red LEDs will flash indicating that the button should be released. The goggles toggle between Compass Mode and Drift Mode each time this process is repeated. Example: From Compass Mode, press and hold the button for three seconds until the red LEDs flash and then release the button. The next time that you turn on the goggles, Drift Mode will be active, Repeat the process to return to Compass Mode.

Tips for Safe Use
Your goggles are an elaborate navigation assistant and contain a 32 bit computer. Steps should be taken to properly clean the goggles after each use and store the goggles when not in use. Never store the goggles on the dashboard of a car, where the temperatures can reach 185° F or more. Do not ever allow the goggles to freeze. After use, be certain to clean any debris out of the USB port, by blowing into the USB port.
Use caution when connecting the USB cable for charging. The USB port is “keyed” and the cable can only be inserted one way. Never force the cable into the USB charging jack in the goggles.
Make certain that your goggles are fully charged before use. Compass Mode will provide up to 24 hours of use before the battery is depleted. Learn what the low battery feedback looks like, so that you don’t confuse this with navigation feedback. When the battery is low, the yellow LEDs will flash yellow, three times, every 30 seconds.
Do not use OnCourse Goggles in a swimming pool. Most pools have large amounts of steel or iron that reinforce the pool and this will affect the magnetic compass readings and accuracy. The chlorine will have an adverse affect on the goggles.
User’s must adhere to safety guidelines and remain aware of their surroundings at all times.
You, as the user, are part of the complete navigation system. When setting a target bearing, make certain that your head is stable with the target centered in your vision before you press the button. The goggles will guide you to where your head was oriented when you press the button, so if your vision jumped to the left before you push the button, the goggles will guide you to the left.
Relax. When you first use OnCourse Goggles, you may see a bit of activity with the LEDs changing from green to yellow, and back to green as you swim. This is normal, and part of the feedback system to help keep your head and torso aligned properly for a more efficient swim. Swim coaches recommend that your head and torso be properly aligned when perfecting your style. When the LEDs change from green to yellow, move your head in small increments to correct your course. If you move your head or torso, your body will follow.
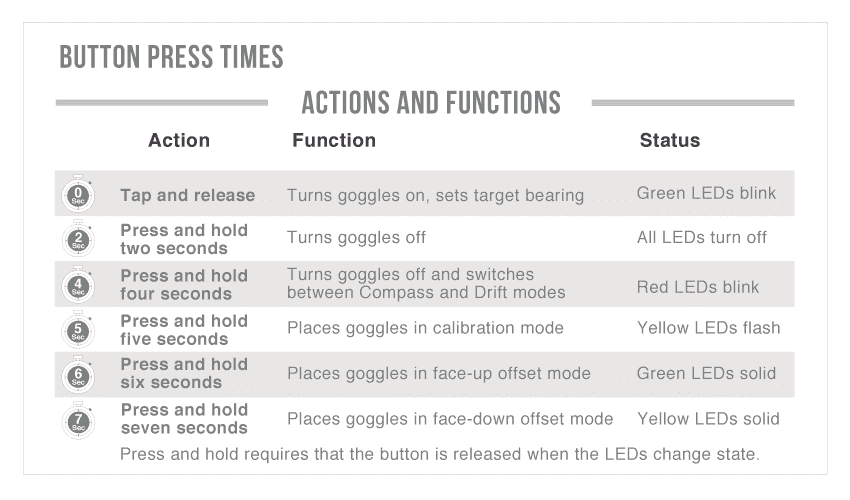
Button Press Times
The pushbutton switch or “button” behind the OnCourse logo is the user interface to our software. In addition to turning the goggles on or off, the button allows the user access to several customization options. Button press times and their actions are summarized below.
%
Performance Gain 1500m Swim
Minutes Shaved Off 1500m Swim
%
Anxiety Reduction
%
Cost Compared to Others
- OnCourse Goggles Performance Boost 15%
- Swim Skin Performance Boost 5%
- Wet Suit Performance Boost 8%
- Aerodynamic Helmet Perfomance Boost 1%
- Aerodynamic Wheels Performance Boost 4%
Swim: 1500m at a pace of 2:00/100m - Bike: 40k at a pace of 18 mph
Open Water Swimming Goggles with an Amazing Advantage
OnCourse Goggles get results. At half the cost of a wet suit, and less than one tenth of the cost of aerodynamic bicycle wheels, OnCourse open water swimming goggles will help you swim straight in open water and can deliver up to a 15% performance improvement, even for an accomplished swimmer. We analyzed a variety of performance enhancing gear such as swim skins, wet suits, aerodynamic helmets and aerodynamic bicycling wheels. Nothing compared to the time savings that are realized during triathlons by swimming in a straight line in open water with OnCourse Goggles.